We all have one. A faded family photo tucked away in a drawer — worn at the corners, yellowed with age, scratched and slowly disappearing. Too precious to throw away, too fragile to leave alone.
I had one too. Then I learned you can restore old photos with AI, so I tried it myself — and honestly, it brought a lump to my throat. Today I’ll walk you through how to restore an old family photo with AI, step by step, no Photoshop or fancy software required.
Why Restore Old Photos with AI
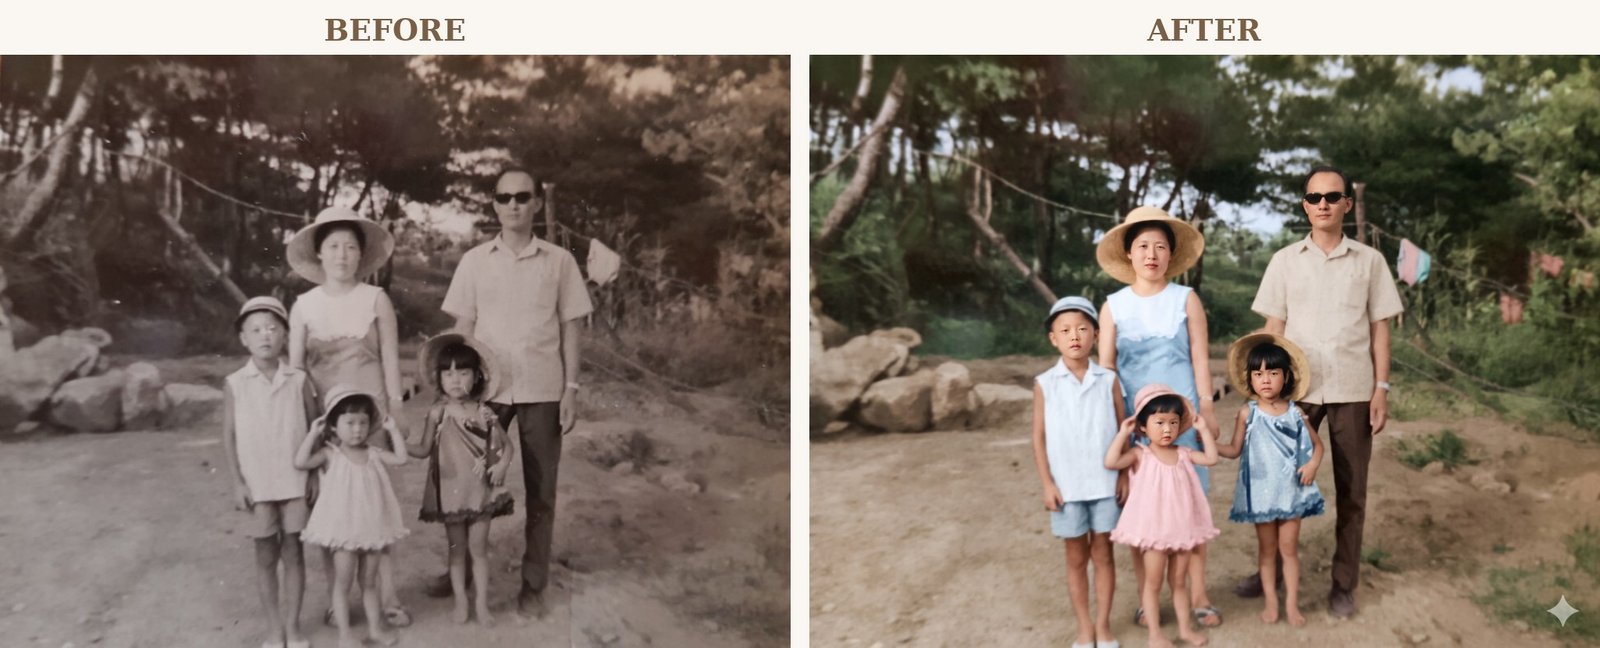
The photo I chose is an old one of my family of five, taken on a pine-shaded path long ago — my mother in a wide-brimmed hat, my father in sunglasses, and three of us kids lined up on a dusty road. That’s me, by the way — the littlest one, in the pink dress.
Over the years it yellowed and the faces grew faint. Restoring a photo like this with AI solves two things at once. First, sharpness — blurred faces and edges come back into focus. Second, color — natural tones are added to a black-and-white image, as if it had been shot in color that day.
What I loved most when I tried it: the faces don’t change. A good restoration tool keeps your family’s real faces and only repairs the damage. That part matters more than anything — I’ll come back to it when we talk about choosing a tool.
Before You Restore — Capture the Photo Well
Honestly, most of a good restoration comes down to how well you digitize the original. This is where the difference begins.
- Scanning is best. If you have a scanner at home, scan at 300 dpi or higher — 600 dpi for photos with fine detail.
- No scanner? Your phone works. Shoot in bright, even light (window daylight is lovely; avoid harsh sun), lay the photo flat, hold the camera square above it, and avoid shadows and glare. A free app like Google PhotoScan removes reflections automatically.
- Avoid tiny or very blurry files. If you can make it out when enlarged on screen, the AI will have a much easier time.
How to Restore an Old Photo with AI — Step by Step
Now for the fun part. I used Google Gemini (Nano Banana) — it’s free, with no Photoshop to buy or learn, which makes it perfect for the rest of us. Better still, the photo you upload and the result stay inside your own account and don’t get posted to any public gallery — so for something as precious as a family photo, a private tool like this feels safe. (Midjourney is public by default, so I’d recommend it less for face photos.)
Step 1 — Upload your photo. Upload your prepared photo to the tool. For most, a single “upload image” button is all it takes.
Step 2 — Tell it what you want, in words. The heart of modern AI restoration is that you describe it in plain language. Here’s what I asked for:
“Restore this old black-and-white family photo and add natural color. Keep all five faces, expressions, poses, hats, clothing, and the pine-forest background exactly the same — only repair the scratches, dust, creases, and fading. Use realistic color that fits a 1960s Korean summer, and keep the texture of a vintage photograph. Do not change the faces or composition.”
One thing I learned the hard way — always write “keep the faces and composition the same.” Leave that out and the AI sometimes “prettifies” the faces, and suddenly it’s a stranger, not your family. But with that one line, all five faces came back just as they were, with only the color added naturally — my mother’s powder-blue dress, the little one’s pink dress, even the warmth of that dusty path, all visible again.

Step 3 — Review and refine. Sometimes the first result is perfect; sometimes you run it two or three times. If the color is too strong, add “make the colors softer”; if it looks too smooth, add “keep the texture of an old photo.”
Step 4 — Save in high quality. Once you’re happy, download the highest resolution available. It’s great for a blog, a print, or your family group chat.
Tips to Make It Look Natural (Lessons From My Own Mistakes)
- Always write “keep faces and composition.” The single most important line.
- Don’t rush the color. Vivid color from the start looks fake. Start soft, build up gradually.
- Make several and compare. The same photo comes out a little differently each time. Pick the one your family says looks “most like them.”
- Always keep the original. No matter how good the restoration is, never delete the original — that one is the real memory.
- Don’t over-perfect it. Leaving a little vintage texture often feels more real and more tender.
Frequently Asked Questions (FAQ)
Q. Can I restore old photos without Photoshop?
A. Yes, absolutely. Free AI tools like Google Gemini, or phone apps, can restore and colorize photos. Photoshop is great for finer control, but a simple tool is more than enough to start.
Q. Will AI change my family’s faces into someone else?
A. If you write “keep the faces and composition the same,” it will usually preserve the original faces. If a result still looks off, run it again or switch to a tool known for strong face preservation.
Q. When you colorize a black-and-white photo, are the colors historically accurate?
A. The AI adds “natural-looking” colors based on its best guess, so they won’t be 100% identical to that day. If you remember a color, tell it — “this dress is blue” — for better accuracy.
Q. How blurry can a photo be and still be restored?
A. If the shapes are recognizable, it usually works. But the clearer the original, the better the result — so the scanning step is where your effort pays off most.
Q. Can I print or gift the restored photo?
A. Of course. Saved in high resolution, it makes a lovely framed gift and a sweet thing to look at together at family gatherings.
A Warm Goodbye
Restoring an old photo turned out to be more than making an image sharper. It was about calling back the air, the faces, the feeling of that day. I love that new technology can be used in such a tender way.
You don’t need expensive gear or hard software — just that one photo in your drawer. Want to pull one out today and bring it back to life together? What’s your most precious photo? Tell me in the comments — and if you get stuck while restoring, share that too. I’ll help however I can.
Curious how I write the requests I give to AI tools? Here’s my guide on how to write better AI image prompts.